Does the idea of going out for a bike ride fill you with a sense of dread? Do you have a desire to either do your first triathlon, or get better at the cycling part because it’s your personal kryptonite? While swimming tends to cause the most hiccups for aspiring triathletes, cycling claims its fair share of victims as well. Worry not! Getting into triathlon as a weaker cyclist is entirely manageable. Set yourself up for success by getting the right gear, developing comfort on the bike, and figuring out how to optimize your workouts.
Gearing Up: The Essentials
Cycling is the gear heavy sport of the bunch. Here are what I would deem the essentials to have in your arsenal, with an explanation down below:
- Bike
- Helmet
- Cycling/Triathlon Shorts
- Jerseys
- Shoes
- Socks
- Water Bottles
- Sunglasses
- Gear bag and tools
Let’s start with the obvious first: the bike. You can start with whatever bike you have and are comfortable with. Don’t let the bike be a hurdle that stops you from trying triathlon. There are lots of choices out there, some of which will make life easier, so let’s dive into the options you will likely see.
Mountain Bikes
Knobby tires, shocks, and disc brakes make these bikes ideal for off-road conditions or hopping on and off of curbs as you speed around town. Unfortunately, those aggressive tires and upright position don’t do you any favors for speed out on the pavement. Lots of people do their first race on a mountain bike but trade it in for a road or tri bike once they realize how much speed they’re leaving on the table.
Comfort Bikes
This is a very general classification for a wide range of bikes. The defining feature here is body position. Comfort for the recreational rider is all about being more upright, which takes pressure off your hands and neck and puts you spine closer to it’s natural position. If you want to picture this bike, think of a “beach cruiser” style bike with wide tires, a plush seat, and swept back handlebars. Much like its mountain bike counterpart, this bike will not be very quick, but it will be more comfortable.
Road Bikes
These are the heart and soul of cycling enthusiasts and are one of the most common styles of bike you will see at a triathlon. The defining features here are skinny tires, a smaller seat, and a more aggressive position. The slim tires reduce rolling resistance, and the body position makes you more aerodynamic, and both mean more speed with less work.
There are always subcategories to consider. There are “comfort” road bikes that place you slightly more upright and have more forgiving frames (less road feel). There are aero frames that tend to cut through the wind better and can be a nice “do-it-all” kind of bike for the triathlete that only wants one bike. And finally, there are the more traditional road frames which are stiffer (more road feel) and place your torso in a more horizontal position. Everyone is different so try each kind out to see what’s for you.
Triathlon Bikes
Triathlon bikes (or time trial bikes) take performance to the next level. These bikes feature deeper aerodynamic frames, very aggressive geometry, and fairly stiff frames. The name of the game here is efficiency and that is why you see so many triathletes get into one eventually. Tri bikes allow you to go faster and farther with less effort so you have more energy for a good run (and race). While the efficiency is great, the more horizontal position changes how the bike handles significantly. This isn’t a starter bike if you’re new to the sport and have your doubts or concerns. Keep it in mind for down the road.
Helmets
There are a ridiculous number of helmets available at a wide range of prices. Fit is the most important factor so be sure to try them on. Other things to consider are how ventilated the helmet is and its weight. You can also consider a triathlon-specific helmet which will get you even more time gains from the aerodynamic design. If in doubt, don’t be afraid to visit your local bike shop for help.
Cycling/Triathlon Shorts
These will be your biggest ally. Many people look at a bike seat and say, “I can’t ride on that!” Well, let me tell you, I couldn’t either without bike shorts. The extra padding goes a long way to making you comfortable and helps to reduce chaffing. Pro tip: Do not wear anything between you and your cycling shorts. They aren’t designed for it. It’s a chaffing nightmare waiting to happen.
Tri shorts are similar to cycling shorts but are far less padded. This helps them to dry after coming out of a swim. Tri shorts are great, but less padding may not be a big turn off if you’re struggling with comfort. It’s 100% okay to start with cycling shorts.
Cycling Jerseys/Tri Tops
Cycling jerseys feature performance-oriented fabrics that help you stay dry, cool, and comfortable. They also have three big pockets on the back, which are great for stuffing things like a vest, snacks, or your phone.
Tri-specific tops are similar, but without the sleeves and less/smaller pockets. Sleeveless is nice, not only because it can help you stay cooler, but also because it dries fast out of the water. If you’re doing shorter races, the limited pockets won’t be terrible. It becomes more of an issue as you go longer and need to carry more.
Shoes
Cycling shoes and pedals connect you to the bike throughout the whole pedal stroke. This means you are creating power both when you push down and when you pull up. This may not seem like a big deal at first, but it helps a ton. It allow you to use more muscles to do the same amount of work (or more), which makes you more efficient and powerful.
Triathlon-specific shoes are a nice upgrade. Their design makes transitions a breeze. They have a bigger opening and different straps that allow you to hop into them while you’re moving. They also are designed to dry out quickly, which you definitely want after you get done swimming.
Socks
Like the jerseys, good socks wick well and help you stay comfortable longer. By no means are they a necessity, but they are very nice. My personal recommendation is Swiftwick. Their socks are beyond fantastic and take a beating. I have several pair that are five years old and going strong.
Water bottles
They’re handy, and not only for cycling. Stock up on a few. You need to stay hydrated.
Sunglasses
A shield for the sun, wind, and bugs is nice. Extravagant sunglasses are not necessary. To start find something that you like and is comfortable.
Gear Bag and Tools
This handy little bag goes behind your saddle and holds all kinds of things. Consider grabbing an extra tube, tire levers, a multi-tool for emergencies, a CO2 cartridge, and an inflator to go in your bag. Don’t skip out on this, stuff happens out there and having an insurance policy with you is wonderful.
Get Comfortable: The Bike Fit
Cycling is the most time intensive discipline in triathlon. Once you lock down your gear, it is worth spending the time to think about how you interact with your bike. You have three points of contact (hands, butt, and feet) that always interface with the bike. The term “bike fit” refers to how these three points are setup. You can do a lot of adjusting on your own. Try out these suggestions to see if your bike is, or even can be, in the ballpark for fitting you well.

Seat Height
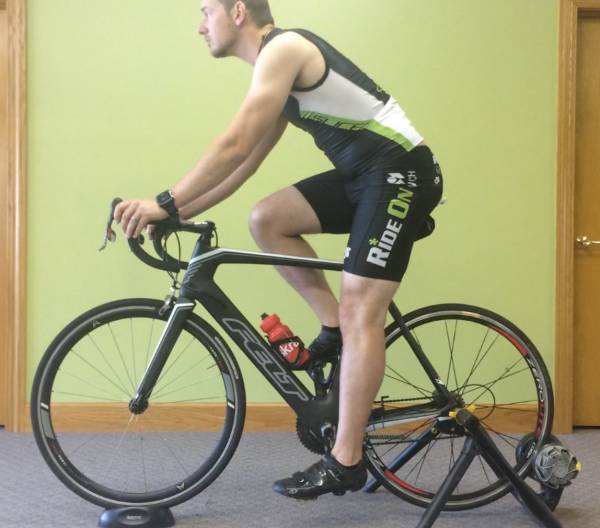
Sit on the saddle and put one of the pedals down at 6 o’clock. Then, move your foot so your heel rests on the pedal. Your extended leg should be straight or very close to it. Alternatively, if you place the pedal mid to forefoot like you would ride in your cycling shoes, you should have a slight bend in your knee.

Saddle Fore/Aft
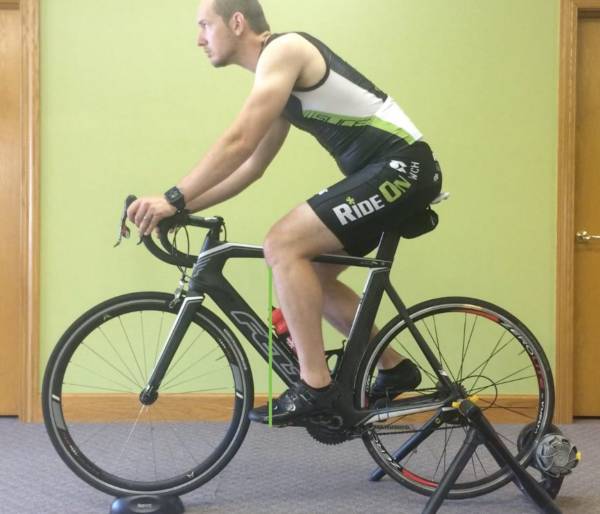
Next, move the crank arm so it is horizontal. Then, either have a friend take a picture from the side or use a plumb line hanging from below your knee cap (on the forward leg) to see where it falls in relation to the pedal. If you were to draw a vertical line from below your knee cap (technically your tibial tuberosity), it should intersect with the center of the pedal. In some cases it may be slightly ahead of it, too. Some fitters may approach this differently for a myriad of reasons, but this is a great place to start.
Saddle Angle
This part can be a bit tricky. As a general rule, start by making the nose of the saddle (the front ⅓ to ½ of the saddle) level or 1-degree downhill. Adjust in small increments from there. Hint: you can use your iPhone to do this with the built in compass app, which includes a digital level. You should feel stable. It should not feel like you’re sliding off towards the handlebars or like your hips tilt backwards.

Handlebars
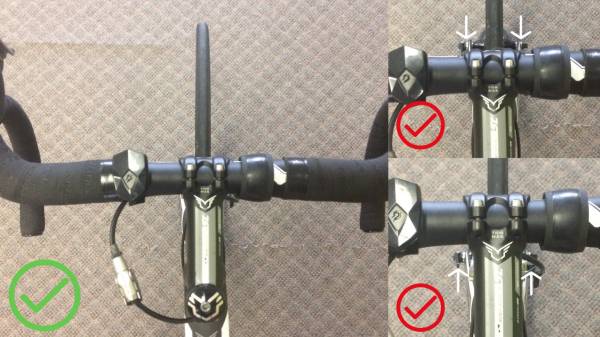
Finally, you can move on to the cockpit (always do your adjustments for the hips down first). If you have your hands on the tops of the handlebars (on the “hoods” for road bikes, not the “drops”), the handlebars should obstruct your view of the hub on the front wheel. Adjusting this is harder because you may need a new stem to change the positioning.
When adjusting your cockpit pay attention to how you feel. Do you feel stretched out? Cramped? Have a friend look. Do your upper arms make a 90-degree angle with your torso? They should be close to perpendicular in relation to your upper body as a starting point.
A Professional Opinion May Be Worth It
Using the above guidelines will get you close, and, at the very least, give you an idea if your existing bike will work for you. If you’re unsure, then I’d recommend getting a second opinion. Consider heading over to your local bike shop to get some help or pick out a bike that will better suit you.
While it is an investment in both time and money, I’d also recommend a professional bike fit if you want to nail down all the details of how your bike fits you. It is one of the absolute best ways to spend your money to get the most comfort and performance out of your ride. They usually take anywhere from two to three hours and cost upwards of $175. It’s worth every bit of the investment.
Know Your Skills: Bike Handling
Once your bike fit is good to go, it’s time to think about bike handling as another means of building confidence. Bike handling skills—what are those? Think of things like riding one (or no) handed, bunny hoping, and riding in packs. Descending and cornering are biggies, too. To those of us who grew up riding (and wrecking) bikes, this may already be pretty natural to you. If you didn’t grow up on a bike, though, you will probably need to spend the time here developing your foundational skills.
What’s the best way to do it? Break it down into bite-size chunks with drills. Drills are nice because you can start small and progress your skills as you improve. If you have any fear or trepidation that comes with riding, drills are great a way to gradually take steps towards feeling more in control on a bike. For a list of drills, broken down by what you want to work on, head here.
Plan two or three mini sessions a week where you solely work on your bike handling. You don’t need more than 15-20 minutes to practice. It can be as easy as adding a little extension to your already scheduled rides.

Build Your Engine – Strategies for Building Fitness
The last area to focus on is getting strong. If you are starting from square one, plan to spend two to three weeks acclimating to being on the bike and building some endurance. These initial weeks are an excellent time to prioritize consistency. The habit of riding two to three days per week will really carry you as you develop your bike legs. Keep the intensity low up front (less than 5 out of 10 for effort) before moving on to anything more intense.
Once you have some legs under you, or if you’ve already been riding awhile, you can consider interval work. Intervals are one of the best ways to build fitness. They are time efficient, and can help you to train specific aspects of your fitness. Try one or two sessions per week to start and be sure to get 48 hours of recovery (active recovery is okay). Not sure what kind of intervals to start with? Try one of these two from my TriStrong training plan:
10-15 x 1 BSE Intervals
Goal: To improve strength, power, muscular endurance, and to boost VO2 max.
Description:
- 15:00 warm-up, from RPE 3/Zone 1&2 (up to RPE 7/Zone 3 &4 by the end)
- 3:00 RPE 3
Then, 10-15x:
- 1:00 Best Sustained Effort, 1:00 recovery
Followed with:
- 5:00 cool down
Best sustained effort (BSE) is the strongest consistent effort you can hold for the interval. Stated another way, it is the hardest you can go without the effort exploding and falling off towards the end. Try to be a little stronger in the last ten seconds.
6-9 x 3 Threshold Intervals
Goal: To improve muscular endurance and power at threshold.
Description:
Take 15-20 minutes to warm-up well, then do 6-9x:
- 3:00 at RPE 7-8 (might feel like a 9-10 by the end), zone 4
Use a 2:00 easy spin to recover, then take 10-15 minutes to continue to easily spin and cool down. Stretch.
Single Leg Drills
Consider adding some single leg pedaling drills into the mix. These are most easily performed on an indoor trainer. It’s as simple as unclipping one foot then pedaling as smoothly as possible (at a normal cadence) for 30-60 seconds at a time. Try to apply power all the way around the pedal stroke. It’s hard. These will really help you to pedal efficiently once you bring both legs back into the picture.
Gear and Strategies to Go Beyond
As you progress you may start to wonder what kind of tools and strategies will help you take it to the next level. Here are some ideas to get you started.
Get an Indoor Trainer
Trainers are great for so many reasons, not least of which is the quality of workout you can get on them. Without hills and wind to contend with, your efforts become far more consistent which means you will get more out of the work you put in. This can be such a time-saver. Trainers are also nice when you need to sneak in workout but can’t get out of the house (because of kids, weather, time, etc.).
Train with Heart Rate
Moving from training with perceived effort to using heart rate will give you a better understanding of your body and help you train more specifically. This also helps you get the most out of your training time. As you get more advanced you can use HR to help you sniff out dehydration or over-training before they bite you in the butt.
Upgrade to a Power Meter
Power meters take training specificity to a whole new level. Power meters tell you how much force you are generating in any given moment (moment being the key word here). While heart rate will lag behind shorter efforts, power will not. It is brutally objective and instantaneous. You will know right away if you are hitting your targets or not. For many, it is a total game changer.
Ride With a Group
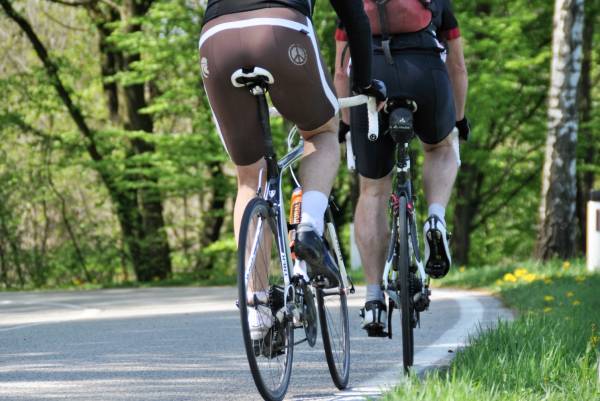
While it’s fine to start out riding a lot of your miles solo or with trusted friends, taking the leap to join a group ride will reap dividends. Often groups are broken into tiers so you can find a bunch that will match your current skill level. Inevitably, you will build better bike handling skills and meet cyclists who will challenge you to be better.
Challenge Yourself
Whenever possible, choose something outside of your comfort zone to work towards. Curvy descents not your thing? Work up to it. Hate climbing? Find a local hill to conquer. Don’t rest on your laurels.
Don’t Forget to Play
Look, I love training hard as much as anyone, but burn out is a real thing. Make sure you integrate some fun into the mix on regular basis so cycling doesn’t become a chore. For me, that has looked like leisure rides with friends or solo rides where I try to get lost a little bit so it feels like an adventure. How it will look for you exactly? Only you can decide.
Get Some Coaching
Nothing beats the accountability and outside feedback of a coach. Some folks can self-coach well, but for many, having a coach pushes them to a whole new level of training and performance. Having a coach is worth considering if you want to take your game to the next level.
This is by no means an exhaustive list but should get you well on your way. What additional questions do you have as a newer cyclist? If you’d like me to cover a topic in an upcoming piece just shoot an email over to info@pulsebeatfit.com and put Coach Gerber in the subject line.


