At the CrossFit Games, it’s not uncommon to witness world-class rowing times with pretty poor technique. That’s not a bash on CrossFit. I just wonder why so little attention is paid to rowing as a skill, compared to Olympic weightlifting and gymnastics. Just as you work hard to become efficient at your butterfly pull ups and squatting, you should also be aiming for efficiency on the rowing machine.
I won’t get into the fitness aspects of why you should use the rowing machine in your training. But let’s remember training – or practice, as I prefer to call it – is about improvement. Here are some easy-to-implement tips to improve your rowing efficiency and make sure your practice yields results.
We’ll start by looking at the two key phases of a rowing stroke, and finish off by learning how to put everything together and smooth it out. You’ll get an analysis of three common errors, along with three awesome drills to fix your firing patterns along the way.
The Recovery Phase
During the recovery phase, you prepare to take the next stroke. The aim of a good recovery is to get ready for the drive phase of the stroke. It is also a time to recover from fatigue. The recovery sets the rhythm of the stroke and allows you to set up the length of the next stroke. A good recovery will set you up for a relaxed but sharp pick up from the legs at the front, with little slippage of the seat.
The sequence of movements for the recovery phase is as follows:
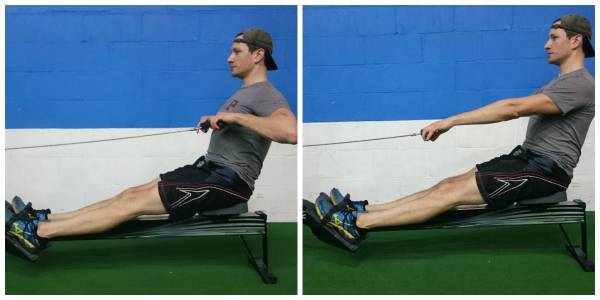
- Your hands come away from your body smoothly, with your knees held down.
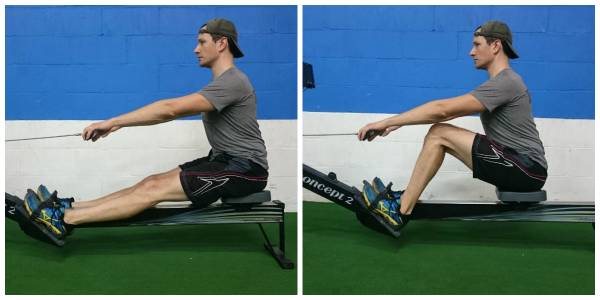
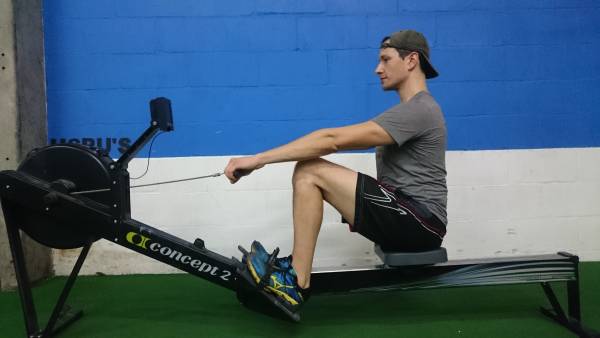
- As your hands pass over your knees, your shoulders follow your hands forward, followed by your body rocking forward from the hips and moving smoothly up the slide. The body angle for the catch position is achieved through a quarter slide forward.
- The speed up the slide remains constant to the catch, with no jerky movements or pauses at any point.
The aim of the recovery is to get you ready for the drive phase.
Pause Drills
Solution: Pause drills
Pauses are an excellent starting point for addressing concerns about body position during the recovery phase.
Pausing after pushing your hands away is good if you do not sit back at the finish and do not hold your knees down when your hands move away from your body. This drill will also aid anyone who has an issue with timing.

Pauses are an excellent starting point for addressing concerns about body position during the recovery phase.
Pausing at the body swing position is a perfect exercise for those who don’t have much hip rock forward. Without this position, your body will not be correctly set up for the drive phase. It is also good for those who do not hold their knees down while their shoulders come forward. Holding the knees down while the hips rock the trunk forward allows for a more efficient and powerful body position.

Pausing at the body swing position is a perfect exercise for those who don’t have much hip rock forward.
The Drive Phase
The aim of the drive is to impart maximum work (force x distance) by driving your legs down against the footplate. The leg drive should be initiated directly after the end of the recovery, with your shins vertical. The drive involves force transfer through your heels, legs, body, and arms working together.
The drive is initiated with your heels. This ensures your upper body and shoulders remain over your knees while your heels press into the footplate. Your body will be “suspended” between the handle and the footplate so your legs can work. Your arms are not exerting any force at this early stage of the drive. The leg drive needs to accelerate throughout the entire stroke.
Midway through the drive phase, maximum force is applied by continuing to suspend, or hang, body weight between the footplate and the handle. Then the hip drive enables you to push against the foot plate without pulling against the handle with your arms. Once your body is almost fully back, your arms come into play. Continue to work on pushing through the heels.

The aim of the drive is to impart maximum work (force x distance) by driving your legs down against the footplate.
Stand Up Drill
Error: Bum shove/Slide slippage
Solution: Stand up drill with tie
This drill is great for demonstrating the hang necessary during the drive phase. Inadequate ability to hang during the drive phase will result in the seat slipping out from underneath you. This drill will correct and assist anyone who struggles to feel the hang from the handle while their legs produce the necessary force.
- Move up to the front of the rowing machine.
- Have your partner stand at the front of the machine and hold the handle, so that you cannot pull it back towards yourself, or attach a tie to do this.
- Push with the legs so that your bum feels light on the seat, allowing your body weight to be suspended between the balls of your feet and hands.
The Force Curve
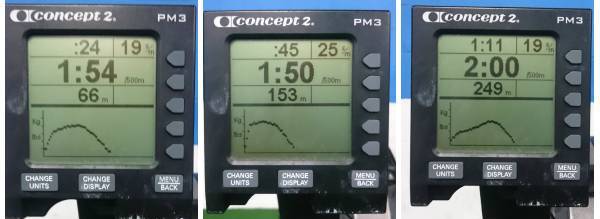
Are you paying attention to the force curve? You can find this function on the Concept2 RowErg monitor (versions PM3 and later) by using the change display button. The shape of your force curve is dictated by the firing pattern of your heels, legs, trunk, and arms during the different phases of the rowing stroke.

Are you paying attention to the force curve?
- The first display shows a broad, flat curve, demonstrating smooth force application and an efficient stroke.
- The second display shows a high power output at the start of the stroke, with power tailing off and a disjointed stroke pattern between the legs, back, and arms.
- The third display shows an incorrect sequential firing pattern during each phase of the stroke.
Legs-Only Rowing Drill
Error: Body opening at the front end
Solution: Legs-only drill

The body angle must remain fixed to allow the legs to work maximally as you pivot from the hip.
Legs-only rowing lays the base for a smooth stroke. When pushing from the front, the body angle must remain fixed to allow your legs to work maximally as you pivot from the hip. If this does not happen, your stroke will be disjointed and inefficient.
To perform legs-only rowing:
- The upper body is left in the position it was set during the recovery, i.e., rocked over from the hips. Drive your legs to full extension.
- This drill can also be done with feet out of the straps. This variation challenges your ability to maintain leg drive throughout the entire stroke and also prevents you from pulling back up on the machine with the foot straps.

The legs-only drill is instrumental in smoothing out your stroke.
Practice Makes Power
Practice these skills, and you will see how they benefit your workouts and improve capacity, especially when the fatigue factor starts to set in.
The longer you can exert maximal effort, the more power you can produce with your new and improved stroke.
More Like This:
- 17 Tips for Getting Better at Rowing
- Respect the Rower: An Argument for the Ergometer
- C2 Rowing Plans and Drills to Improve Times and Technique
- New on Pulse Beat Fit UK Today
References
1. Kleshnev, V. (2011). Biomechanics of rowing. Rowing Faster.
2. Kleshnev, V. (2001). Rowing Biomechanics News Letter.
3. Youtube. (2014). Legs Only Drill. [Online Video].
4. Youtube. (2014). Pause Drill. [Online Video].
5. Youtube. (2015). Technique. [Online Video]
Photos courtesy of Barrie-Jon Mulder.


