It can be tough getting MMA athletes and martial artists to put enough focus into their strength and conditioning. Most love the thrill of competition and practice, but the sterile environment of many commercial gyms can leave them cold, so it’s easy to see why many don’t give their fitness work the effort it needs.
Compounding this is the fact that developing strength and conditioning for MMA and the martial arts can be confusing because the needs of these athletes are varied. Your individual style, physical attributes and abilities will determine the proper way that you should develop your training program.
My approach to this dilemma is simple. I develop programs that support the training needs of these athletes rather than developing fitness for its own sake. I generally set the following guidelines regarding strength and conditioning for MMA athletes:
- Will the activity directly improve an athlete’s performance in training and/or competition?
- Will the activity enable faster (and better quality) skill learning?
- Will the activity reduce the incidence of injury and/or encourage recovery?
This article will cover some of the training principles and practices I include when working with MMA athletes – all using the humble sandbag.
A Multi-Disciplined Approach To Training
Much like the blend of styles required for today’s high-level MMA competition (boxing, muay Thai, wrestling, jiu jitsu, and more), it’s also important to take a balanced approach to your fitness.
For a well-rounded approach you should include some agility, endurance, strength, power, mobility/flexibility, and speed work. Much of this can come through skills-based work, but it’s also vital to include some supplemental strength and conditioning.
Using strength and conditioning exercises that also have some functional parallels in your sport is a great idea.
Why Sandbags? An Alternative Resistance Training Option
Although used by serious athletes for decades, the sandbag has struggled to go beyond being an alternative option in strength and conditioning. Most people add in some sandbag training for a change when their existing program becomes stale. I hope I can go some way toward convincing you that it has a place in your training year round.
A key point to remember is that sandbag training is resistance training. You’ll get many of the same benefits associated with traditional forms of resistance like barbells and dumbbells. The sandbag does also have a number of other distinct advantages though:
- It’s incredibly tough to work with. The sandbag is an awkward load that will make you work for each and every lift. While this means you won’t necessarily be able to lift as much weight as you can on a bar, it will be a truer representation of how you can handle a “real-life” load – like an opponent.
- The sandbag will naturally develop your grip strength. Rather than including a lot of additional grip work, the very nature of the sandbag means you’ll develop an iron grip just trying to hold onto it.
- The sandbag is malleable and will mold to your body shape. This makes it a great tool for carries, sprints, throws, and a range of partner exercises. You can also use the sandbag to simulate grappling with an opponent.
Getting Started
One of the biggest benefits of sandbag training is that you can get started with the bare minimum of investment.

When I originally started training with sandbags I used a homemade bag that literally cost me nothing to make. I just took an old bag of sand, put it inside a duffel bag, and I was good to go.
You can also invest in a custom-made sandbag that has specifically been designed for strength and conditioning use (my personal favorite is the Brute Force Sandbag.
By far and away the simplest way to construct a homemade sandbag is by using a duffel bag or holdall.
You can then add contractor/builders bags of sand directly into this outer shell. These bags of sand are generally sold in 25kg/55lb weights so you may need to adjust the weight before you can start.
To do this, make a small slit in the bag of sand and remove what you don’t need. You’ll then need to tape up the bag to avoid any leakage (use strong tape for this).
Whatever option you go for, sandbag training is an accessible and affordable training method. In this respect it trumps many of the traditional resistance training options that either require gym membership or costly equipment.
With so many existing barriers to exercise it’s important that you understand that your results are not dependent upon your budget.
My Top 3 Tips For Integrating Sandbag Training

1. Use sandbag training as a supplemental activity.
Sandbag training is not a magic formula, nothing is. You’ll get consistent results by applying hard (and smart) work over time. With that in mind, I’d recommend adding in some sandbag training to your existing program rather than trying to replace everything.
Try integrating one or two sandbag conditioning sessions per week. The following exercises have been taken from my book Sandbag Training For MMA & Combat Sports.
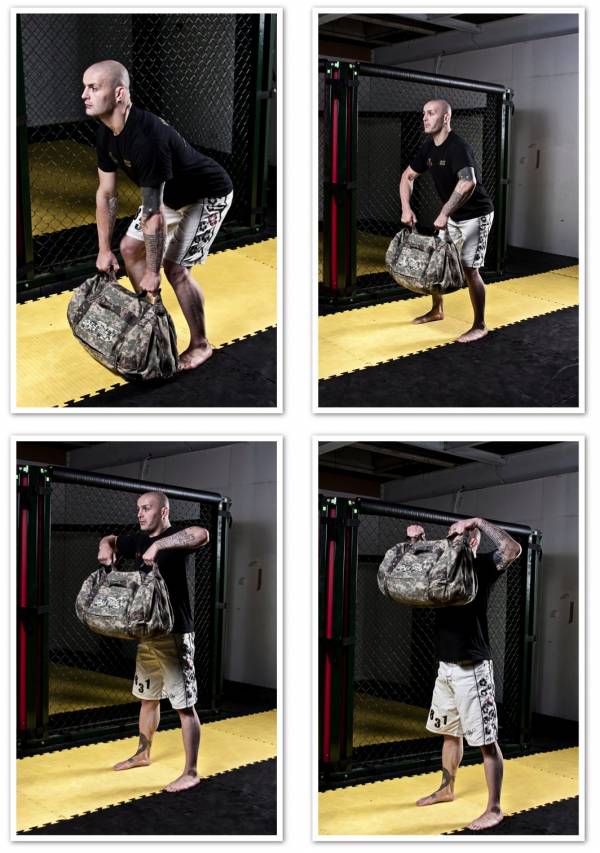
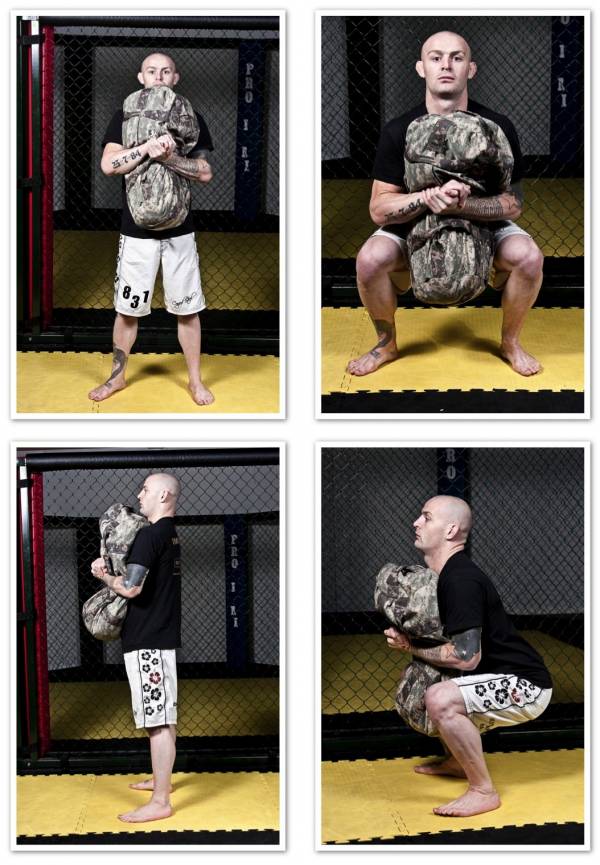
Try this workout – Complete as many repetitions as possible in 1 minute per exercise. Rest for 1 minute between each set of 4 exercises and repeat for a total of 2-4 rounds:
- Bear Hug Squats (see photo #3)
- High Pulls (see photo #2)
- Floor Press (see photo #1)
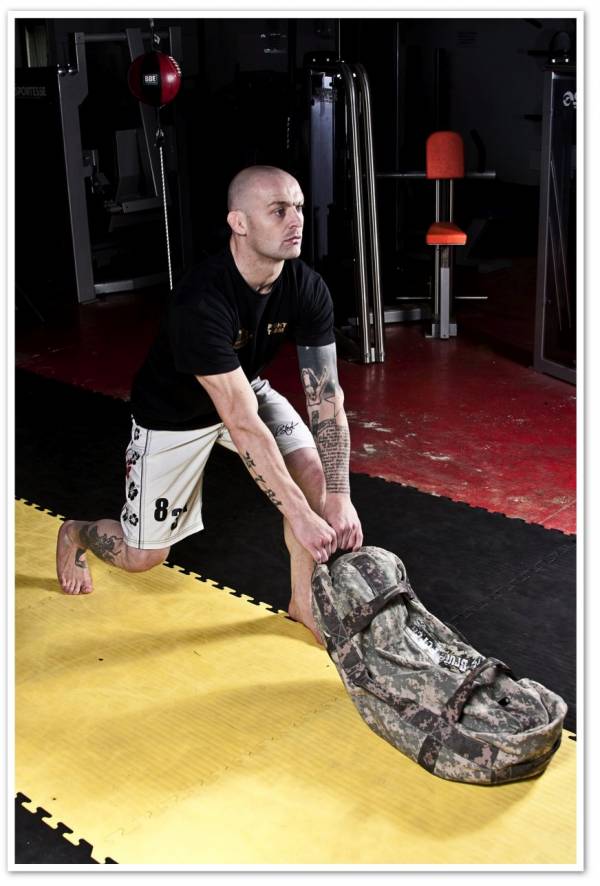
- Backwards Drags (drag for 20m, turn, and repeat – see photo #4)
2. Use exercises that are sandbag specific.
It is entirely possible to replace a number of key barbell strength and conditioning exercises (like deadlifts, squats and presses) with the sandbag.
There are many benefits to doing this, but I still recommend that the sandbag be used for exercises that make the most of its inherent benefits. These are some exercises that I’d class these as being fairly unique to the sandbag:
- Shouldering – Lifting a sandbag up onto your shoulder is a surprisingly tough exercise, despite its simplicity. Done for reps this is a serious conditioning work.
- Bear Hug Movements – Anything where you’re holding the sandbag in a Bear Hug (or similar position) is a great way to develop the strength and conditioning required for grappling. Try it for squats, lunges, or load carries and experiment with different grips on the sandbag. There are very few training tools that work as well as the sandbag for this – except perhaps the atlas stone.
- Load Carries, Drags and Throws – The sandbag is perfectly suited to being carried, dragged, and generally abused. You can add heavy sandbag drags into your agility work or try incorporating throws with a partner.

3. Apply sound training principles.
No matter what the training tool you should be applying sound training principles. Aim to base the majority of your program on compound (multi-joint, multi-muscle) exercises that will have a greater transfer into your sporting performance.
A blend of strength (higher weight, lower repetitions, long rest periods) and conditioning (lighter weight, higher repetitions, shorter rest periods) work is vital for high-level MMA performance. So this is also something you should emulate in your sandbag training program.
In Summary
Sandbag training, properly implemented, can be a great fit for anyone involved in combat sports and the martial arts. Like any form of resistance training it can be used to improve your strength and conditioning, but with the added benefit that the sandbag will also help you to improve a number of sport-specific attributes.
You can read the Pulse Beat Fit book review of Sandbag Training for MMA & Combat Sports.


