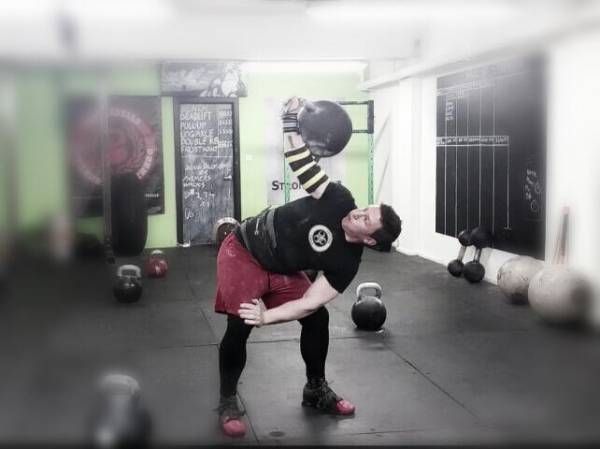
The bent press is an amazing exercise that aids in thoracic mobility, shoulder strength and stability, and allows you to press a great amount of weight overhead. This article takes you through the steps of how to do a proper bent press.
Benefits of the Bent Press
In a previous article, I discussed reasons to do a bent press. Of all the benefits, I like the thoracic mobility and strengthening of the shoulder the most. However, this exercise also teaches you how to handle a heavy weight over head. A one-handed heavy load over head teaches you to be stable and how to lock out. If you are a beginner to intermediate Olympic lifter, this skill can be very beneficial.
Another benefit that might be appealing is simply that you can lift heavy weight overhead. The secret to this lift is that it is all about moving the body under the weight. You are not pressing the weight. Thus, you can lift a great deal more than usual by using proper leverage. Take a look at the video below of Oliver Quinn “pressing” 80kg (176lbs).
The bent press, demonstrated in full by Ollie Quinn.
One interesting feature of the bent press is that almost any weighted item can be used. I have seen kettlebells, dumbbells, and barbells used, as well as less traditional items, such as people and boulders. In this article, I am going to focus on the kettlebell and barbell. A barbell will be a bit more difficult as the load is spread out, making it more difficult to balance. Most everything else will follow the same patterns as with these implements.
How to Do the Bent Press
Video with tips to set up for the bent press.
Step 0 – Prerequisites
Dave Whitley’s book Taming the Bent Press provides many exercises to build mobility and the strength needed to do a proper bent press. There are many possible mobility sticking points, so I recommend this book for a more detailed analysis of the prerequisites.
Step 1 – Clean
The first step is to get the kettlebell or barbell in a rack position. Thus, we need to clean it up into position. The simplest way to do it with a kettlebell is to use both hands to curl it up into the rack. A barbell can be stood on end so you can grab it in the center. You can then tilt and lift it up into the rack.
“The big difference between the kettlebell and barbell is in this first step. From here, the movement is pretty similar except the barbell is tougher to balance.”
Once you have the weight cleaned, then you are going to rotate the opposite foot about 45 degrees away (as if you were going to walk like a duck). The foot under the weight will angle toward the other foot (inward), but to a much smaller angle.
The big difference between the kettlebell and barbell is in this first step. From here, the movement is pretty similar except the barbell is tougher to balance. (For simplicity, I will just use the kettlebell as the example for the rest of the article.)
Step 2 – Rack
The rack position for the bent press is slightly different than in a normal kettlebell press. You want your arm to feel connected to your lat. With that connection, you are going to rotate the arm outward (away from chest). At the same time, you are beginning the rotation of your body in that same direction. The hip under the weight will shift outward as you begin this rotation. Think about resting your elbow on that hip (but it won’t actually reach it). Your goal for the rest of the movement is to keep that forearm perpendicular to the ground.
Step 3 – Bend
The bend has a simultaneous corkscrew (your body moving toward the front and the weight moving behind). As you start the bend, most of the weight will be driven into the back leg. As you move under the kettlebell, the weight eventually transfers to the opposite leg. The goal of this movement is to move away and underneath the weight. If you were to look at only the weight (and the forearm), you would see it in the same position.

Some people can lock out the arm with the bend. Others might need to squat a little to get completely locked out. It depends on your body type. The goal is to get under the weight and not press it out. Thus, you may need to squat a little to get under it completely. During the bend, you will keep your gaze on the weight.
Step 4 – Stand Up With the Weight
After the arm is completely extended, you will do a slight corkscrew (opposite of the way down) to stand with the weight overhead.
Step 5 – Return the Weight to the Ground
Once the lift is completed, it is important to safely get the weight back down to the ground. This weight is likely heavier than what you usually work with, so pay special attention to how you bring it back to the ground.
Summary
The bent press is an elegant movement with many benefits besides being able to press large amounts overhead. The secret to the bent press is that you are moving under the weight rather than pressing it. Again, I suggest reading Taming the Bent Press, as it has a great many more cues and programming.
Further Reading:
- 3 Reasons You Should Do the Bent Press: The King of Lifts
- Lessons From a Modern Day Strongman
- Reset Your Mobility With These 3 Essential Movement Patterns
- New on Pulse Beat Fit Today
Photo 2 courtesy of Ollie Quinn.


