You’ve been working on your handstand for a while now. You’ve spent countless hours on line drills, hollow bodies, and shoulder mobility. Most of your training sessions consist of lots of time upside down with your nose to the wall. You’re pretty sure it’s time to take the next step.
“You kick up and ease into position, but try as hard as you might, you just can’t seem to hold the handstand for longer than a few seconds.”
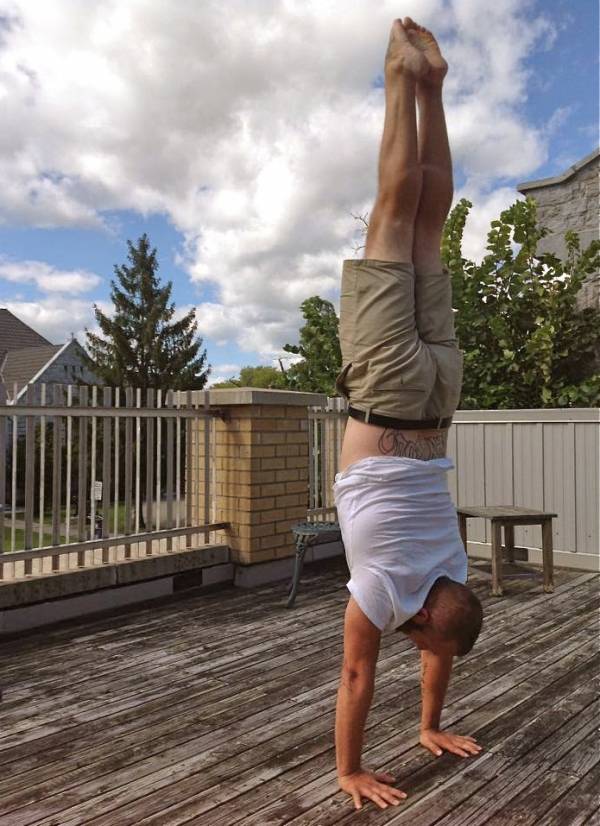
You’ve mustered up the courage to move away from the safety of the wall and braved the challenge of a freestanding handstand. You kick up and ease into position, but try as hard as you might, you just can’t seem to hold the handstand for longer than a few seconds.
You have the strength, you have the mobility, and you have the stability. So what’s wrong?
From the Wall to a Freestanding Handstand
Don’t worry, there’s nothing wrong with the hard work you’ve put in over the past few months. The wall was great for improving strength, building endurance, and reinforcing your line. But you’re not actually “standing on your hands” when using the wall for support. Just as you held onto the couch while learning to stand as a baby, you’ve used the wall to help you become comfortable standing on your hands.
The wall was great for improving strength, building endurance, and reinforcing your line.
And like letting go of the couch to balance on your feet, moving from the wall to a freestanding handstand is a completely different animal. You’re literally learning how to stand on your hands. This takes technique, balance, and body awareness that you’ll build with practice.
But there are a few things you can do right now to instantly improve your freestanding handstand. Practice them diligently and your time spend balancing upside down will go up with each session.
1. Squeeze Your Thighs Together
Not squeezing your legs and thighs together is a common beginner mistake. When you’re upside down, make your body as rigid as possible. By squeezing your thighs together, you’ll create more tension through your trunk and core.
“The more tension you create, the sturdier your handstand will be and the less effort you’ll put into maintaining balance.”
Combine this with pointing toes and squeezing your glutes and you’ll generate a ton of tension. The more tension you create, the sturdier your handstand will be and the less effort you’ll put into maintaining balance.
2. Play the Piano and Treat Your Hands Like Feet
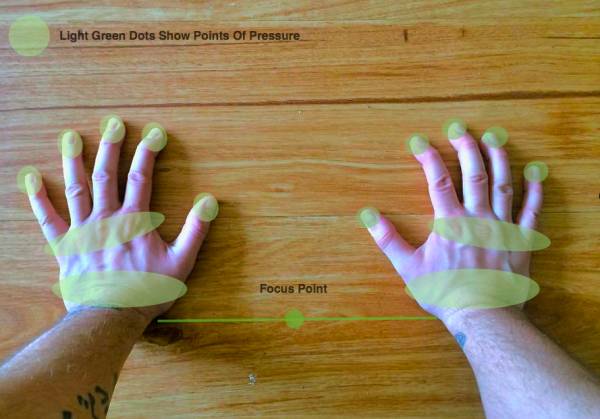
No, you don’t actually have to go out and lean how to play the piano. You also don’t have to learn how to play one with your feet. (Although, that would be impressive!) What I’m taking about is finger spacing and where the points of pressure should be on your hands.
Your fingers should be spread apart as if you were playing the piano. This creates a wider base and provides a little more stability. Think about your fingers like the toes on your feet. Healthy feet have toes that are spread apart, providing greater balance and sensitivity. When you stand on your feet the pressure is spread across the toes, ball of the foot, and heel.
“Your fingers should be spread apart as if you were playing the piano. This creates a wider base and provides a little more stability.”
During a handstand, the points of pressure on the hands will be similar to that of the foot. After all, we’re basically forcing your hands to act like your feet. The pressure should be placed on the tips of the fingers, underneath the first knuckles of the hands, and on the heel of the palms. The second knuckles should be raised and not touching the ground. We now have a wide base with sturdy points of contact.

The pressure should be placed on the tips of the fingers, underneath the first knuckles of the hands, and on the heel of the palms.
When your weight drifts too far forward, making you feel as though you’re about to fall on your back, you’ll push down into the fingertips pushing your body back into balance. When your weight drifts back, making you feel you’re about to land on your feet, you’ll push into the heels of the hands rebalancing your handstand.
To grasp the concept further, try it out while standing on your feet. Stand up tall, lock your knees, and assume a rigid posture. Now, lean forward only hinging from the ankles. Your toes will dig into the ground in an attempt to prevent your from toppling over and push you back into balance. Lean back and your heels will press down, pushing you back into your upright position. When balanced in a handstand, we’re attempting to make your hands do the same.
3. Reach for the Sky (or Through the Ground)
Another weak link in your handstand can come from inactive shoulders. Relaxing the shoulders during a handstand puts more pressure across the chest, makes you more likely to arch your back, and requires you to use more effort in order to hold the handstand. Combine those, and you have a recipe for one ugly and tiring handstand.
“In order to clean up your handstand, lock your shoulders into place and get them actively involved. This can be achieved by ‘reaching for the sky.'”
Remember, during a handstand a rigid form is your friend and your body should only hinge from the wrists. In order to clean up your handstand, lock your shoulders into place and get them actively involved. This can be achieved by “reaching for the sky.”
When you’re upside down, think of reaching your hands through the ground. When you do this correctly, your shoulders will shrug up and hug your ears and your scapula will be elevated. By doing this, you’ll create stability through the shoulder girdle and be able to balance in your handstand with greater ease.

When upside down, I think of reaching my hands through the ground.
4. Improve Your Focus
Selecting a focus point while you’re upside down will go a long way in helping you maintain your balance. I suggest looking through the top of your eyes at a point between your hands and inline with your wrists – but don’t crane your neck. The goal is to stare at the point without moving your eyes at all.
While focusing on this point, it might be handy to run through a mental checklist of the other techniques used to improve your handstand:
- Squeeze your legs together
- Point your toes
- Squeeze your butt
- Shrug your shoulders
- Spread your fingers
- Breathe naturally
An easy exercises to improve your focus can be done while standing. Choose an object in the room, something small, and stare at it for sixty seconds without looking away or becoming distracted. This will help improve your ability to focus without the added complication of balancing upside down.
“I suggest looking through the top of your eyes at a point between your hands and inline with your wrists – but don’t crane your neck.”
Summary
At first it can seem a little daunting to have so many things to remember, especially when you’re trying not to fall over. Don’t worry, in time you won’t have to think of these techniques and they’ll just happen naturally. With continued practice and attention to the little details, you’ll be well on your way to becoming a handstand ninja.
Check out these related articles and videos:
- How to Hold a Freestanding Handstand
- Conquer the Art of the Freestanding Handstand (Video)
- Freestanding Handstand Therapy (Video)
- What’s New on Pulse Beat Fit
Photo 1 courtesy of CrossFit Empirical.


